Posted by
bogonko
Remote Assistance provides a way for you to get the help you need when you run into problems with your computer. If you're an experienced user, you can even be the one to use Remote Assistance to directly help your friends and family members.
There are three ways to use Remote Assistance, described in the articles in this section. The fastest is via instant messaging using Windows Messenger, described in the first article to the right. You can also initiate Remote Assistance sessions via e–mail, as described in the second article. If you use a Web–based e–mail service, such as MSN® Hotmail®, you can fill out a form and save it as a file to attach to an e–mail, described in the third article.
To use Remote Assistance, you will need:
•
Two computers running Microsoft Windows XP Professional or Windows XP Home Edition. The computer receiving assistance and the computer providing assistance must both run Windows XP.
•
Both computers must be connected via a network or the Internet.
•
Windows Messenger must be installed on both computers.
Start a Remote Assistance Session from Windows Messenger
Use Remote Assistance via Instant Messaging
Published: August 24, 2001
For this scenario, assume you are seeking help from a friend. To send a Remote Assistance request via instant messaging:
1.
Start Windows Messenger and sign in.
2.
In your list of contacts, select a person to ask for help. You will send an invitation to this person, asking them to start Remote Assistance and provide you with help. He or she must be online.
3.
Click Tools, click Ask for Remote Assistance, and chooses the e-mail address for a contact, as shown in Figure 1 below.
-or-
If you are already exchanging messages in the Conversation window, click the Invite button, point to To Start Remote Assistance, and then click the contact you want to invite.
Figure 1. Starting Remote Assistance with Windows Messenger
•
If your friend accepts the invitation and starts to take control of your computer, you will see a dialog box asking you to confirm permission. Click Yes if you want to continue.
Note: Although you relinquish control of your computer temporarily, you retain control over the Remote Assistance session itself. You can end the session immediately by clicking the Stop Control button (or pressing the ESC key).
Your expert coworker receives the invitation as an instant message and performs the following steps to accept, take control of your computer, and begin helping:
1.
Click Accept in the instant message.
2.
A dialog box will ask for the password to initiate the Remote Assistance session.
3.
Enter the password and click Yes. When the remote connection is established, the Remote Assistance session will open as shown in Figure 2 below.
Figure 2. The expert's view of Remote Assistance
1.
Click the Show Chat button in the top left corner of the screen.
Note: When the Remote Assistance session opens, you will see two Start menu buttons. The outside Start button controls your computer, the inside Start button controls the computer that you are assisting.
2.
Click the Take Control button. This button is located just above the taskbar. At this point, the person who sent the invitation must confirm permission for you to take control.
After you take control, you can work on the remote computer, using the mouse and keyboard as normal, to help the other person.
Start a Remote Assistance Session with E-Mail
Use Remote Assistance via E-Mail
This section explains initiating Remote Assistance via e–mail to a corporate Helpdesk, although you can also send a Remote Assistance request via e–mail to a friend, colleague, or support professional.
To initiate Remote Assistance via e–mail
1.
Click Start, and then click Help and Support to open the Help and Support Services page.
2.
Click Invite a friend to connect to your computer with Remote Assistance. This is located under the Ask for assistance heading. The opening page of the Remote Assistance wizard appears.
3.
Click Invite someone to help you, and then enter the e–mail address of the friend, coworker, or support professional. Click Continue. The E–mail an invitation page appears.
4.
Enter your name, and then type a message summarizing your problem. Click Continue. Set an expiration time for the session, and specify a password.
5.
Click Send Invitation, as shown below.
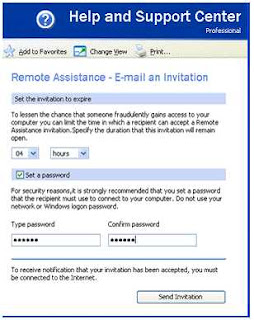
Note: You must relay the password to your friend, coworker, or support professional in a separate communication such as a phone call or e–mail.
The wizard confirms that the invitation was sent successfully.
Your friend, coworker, or support professional can then accept the invitation and intiate Remote Assistance as in the previous methods.
To accept the e–mail invitation and initiate Remote Assistance via e–mail
1.
Open the e–mail message and the attached file. Enter the password in the dialog box. Click Yes.
2.
When the Remote Assistance screen opens showing the remote desktop, click Take Control. At this point, the person who sent the invitation must confirm permission for you to take control.
Start a Remote Assistance Session by Sending a File
Use Remote Assistance via Sending a File
If you use Web-based e-mail such as Hotmail or other similar services, you can use Remote Assistance by saving your request as a file and attaching it to an e-mail.
To invite a coworker to help you via Remote Assistance
1.
Click Start, click Help and Support, and then click Invite a friend to connect to your computer with Remote Assistance. This is located under the Ask for assistance heading.
2.
Click Invite someone to help you, and then select Save Invitation as a file.
3.
Enter your name, and then choose a time on the Set the Invitation to Expire drop down box, (the default is 1 hour). Click Continue.
4.
Type in a password and then click Save Invitation. The Save File dialog box appears. Save the file in the My Documents folder as shown below.
5.
Open the My Documents folder, select the invitation file, and then click E-mail this file.
6.
Enter the address of your coworker and send the e-mail. Your coworker will receive an e-mail message like that shown below.
7.
After sending the e-mail, you will need to inform your coworker of the password. You can do this in a separate e-mail, over the telephone, or any way that is convenient and secure.
Your coworker can follow these steps to accept your invitation and start helping you.
To accept a Remote Assistance invitation
1.
Open the e-mail message, and then open the attached Remote Assistance Invitation file. The Remote Assistance Invitation box appears as shown below.
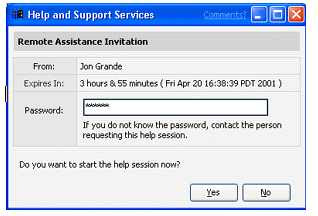
2.
Enter the password and click Yes.
3.
The Attempting to Start Remote Assistance Session box appears. You can begin Remote Assistance as explained in the previous section, Using Remote Assistance Via Instant Messaging.
Sending a file
During a Remote Assistance session, you can send files from your computer to the remote computer. For example, you may send a file that is needed to fix a problem on the remote computer. This requires action by both parties, the helper who sends the file and the requestor who must accept it and save it.
To send a file when helping someone via Remote Assistance
1.
In the chat dialog box, click Send a File, and then type the file path or click Browse as shown below.
2.
Select the file and click Send File.
To receive and save a file from someone who is helping you via Remote Assistance
1.
When you receive notification that someone is sending you a file, click Save as, as shown below.
Choose a folder in which to save the file. Note that you can also decline to receive the file by clicking Cancel.

 You can now chat with you facebook friends directly from you Mobile phone, thanx to Mig33. Don't just change your status, commnet on friends post or send them messages, chat with them too from your mobile phone. What you need is the latest version of mig33 and you are good to go. You can also chat with your contacts on Yahoo!, Gtalk, MSN and AIM right from within the application.


